Oven-baked cheesy tacos are the weeknight dinner upgrade you didn’t know you needed. Stuffed with seasoned ground beef, melty cheese, and crispy taco shells, this hands-off twist on taco night turns a crowd-pleaser into an even easier, no-mess meal.
What makes them special? Everything gets baked together in one pan — the shells stay golden and crunchy, the cheese melts into every layer, and the fillings stay juicy and flavorful. Perfect for feeding a hungry family, meal prepping, or hosting casual gatherings, these tacos are the definition of loaded comfort food.
Inspired by Tex-Mex flavors and the convenience of casserole-style cooking, this recipe gives you the best of both worlds: crispy, cheesy, and packed with flavor — all from the oven.
Ingredients Overview

Let’s break down each ingredient and how it adds to the flavor, texture, or versatility of these baked tacos.
Ground Beef
The classic filling — savory, juicy, and easy to season. Choose 85/15 ground beef for the best balance of flavor and minimal grease. Browned and drained, it’s the perfect base for seasoning.
Substitutes: Ground turkey, chicken, or plant-based crumbles work great for lighter or vegetarian versions.
Taco Seasoning
A blend of chili powder, cumin, paprika, garlic powder, onion powder, oregano, and salt. Use a store-bought mix or make your own for bolder flavor.
Tip: Add a splash of water or tomato sauce while simmering to help coat the meat evenly.
Taco Shells
Use crispy, stand-and-stuff taco shells so they stay upright while baking. They hold more filling and don’t collapse under heat.
Tip: Warm the shells briefly before filling to prevent cracking.
Shredded Cheese
Use a melty cheese like Monterey Jack, cheddar, or a Mexican blend. Sprinkle some under and over the filling for ultimate cheesiness.
Vegan option: Use a dairy-free meltable cheese.
Refried Beans (Optional)
Adding a layer of refried beans at the bottom of each shell brings creaminess and helps the filling stay in place.
Variation: Use black bean mash or skip entirely for a meat-only version.
Diced Tomatoes or Salsa
Adds moisture, acidity, and brightness. Spoon a bit on top before baking, or serve fresh after.
Onion & Garlic
Sautéed with the meat for aromatic flavor. Use fresh white or yellow onion and minced garlic for best results.
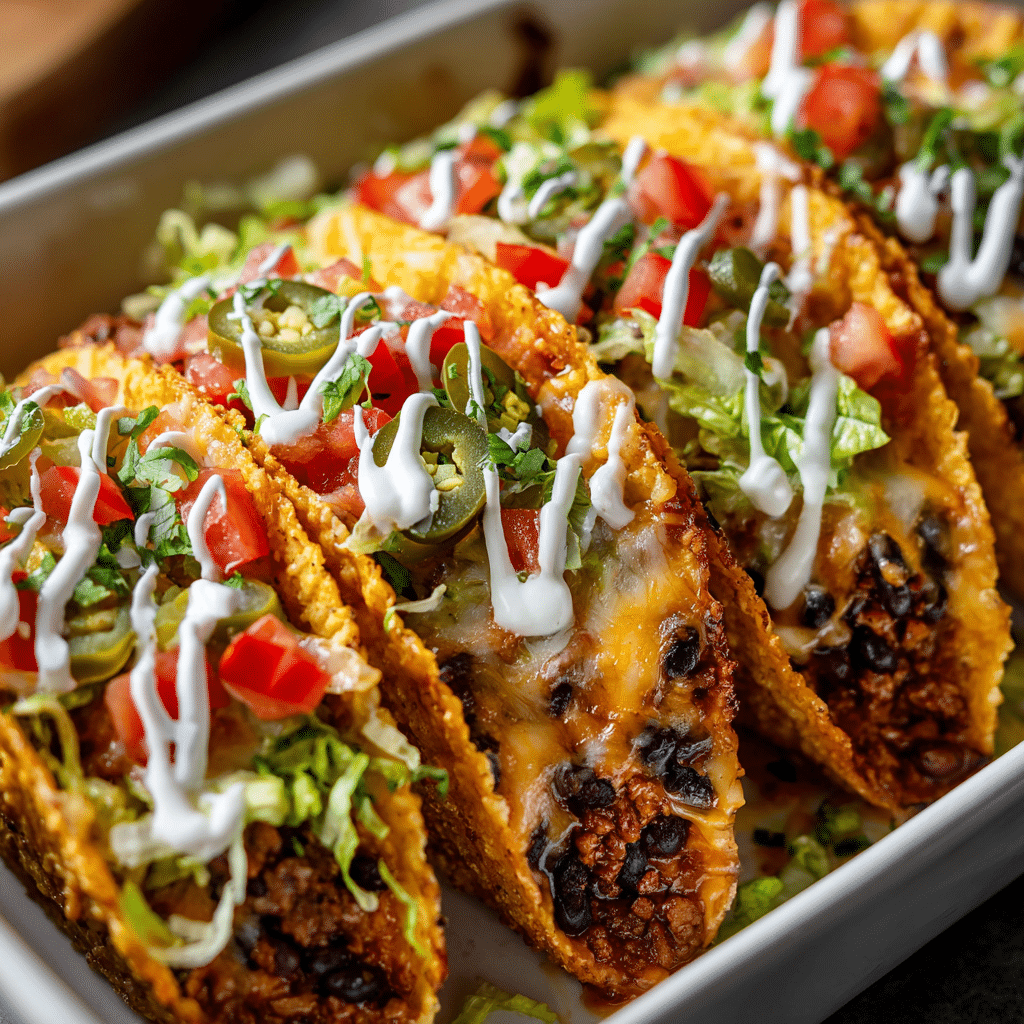
Toppings (After Baking)
-
Shredded lettuce
-
Diced avocado or guacamole
-
Sour cream or vegan yogurt
-
Chopped cilantro
-
Pickled jalapeños
-
Lime wedges
Keep toppings cold and crisp for contrast with the warm, cheesy filling.
Step-by-Step Instructions
Making oven-baked cheesy tacos is simple — the secret is layering and baking them just right for crispy, melty perfection.
1. Cook the Meat
In a skillet over medium heat, cook 1 pound of ground beef until browned (about 6–8 minutes). Drain excess grease. Add taco seasoning and ¼ cup water. Simmer 2–3 minutes until well combined and slightly saucy.
Optional: Stir in ½ cup of salsa or fire-roasted tomatoes for extra flavor.
2. Preheat the Oven
Set your oven to 375°F (190°C). Lightly grease a 9×13-inch baking dish or line it with foil for easy cleanup.
3. Fill the Taco Shells
Arrange 10–12 stand-and-stuff taco shells upright in the dish.
Optional layering idea:
-
Spread 1 tablespoon of refried beans in each shell.
-
Add a spoonful of seasoned beef.
-
Top with a generous sprinkle of shredded cheese.
Repeat until all shells are filled.
4. Bake
Loosely cover the dish with foil (to prevent over-browning) and bake for 10 minutes. Remove foil and bake another 7–10 minutes, until the cheese is fully melted and the shells are crisp around the edges.
Chef tip: For extra crispiness, broil for the last 1–2 minutes — but watch closely to avoid burning.
5. Add Toppings & Serve
Let the tacos cool slightly, then top with your favorite fresh ingredients. Serve immediately while the shells are still hot and crunchy.
Tips, Variations & Substitutions
-
Vegetarian version: Use black beans, lentils, or meatless crumbles instead of ground beef.
-
Spicy twist: Mix chopped jalapeños into the filling or top with chipotle crema.
-
Kid-friendly tip: Leave toppings like lettuce and salsa on the side so everyone can customize.
-
Cheese boost: Layer a bit of cheese between the beef and top for extra melt factor.
-
Freezer hack: Cook and season the beef ahead of time, then freeze in portions for quick prep.
Serving Ideas & Occasions
Oven-baked cheesy tacos are ideal for:
-
Family dinners: Serve with Spanish rice, chips & salsa, or corn salad.
-
Game day spreads: Bake a double batch and keep warm in the oven.
-
Party platters: Serve alongside a taco toppings bar so guests can pile on their favorites.
-
Meal prep: Bake once, then reheat a few at a time throughout the week.
Pair with sparkling water, limeade, or a chilled cerveza for the full experience.
Nutritional & Health Notes
Each taco is satisfying and rich in protein, making it a great option for hearty meals. You can balance it out by:
-
Using lean meat or plant-based options.
-
Adding beans for fiber.
-
Serving with a side salad or veggie sticks for added freshness.
-
Swapping sour cream for Greek yogurt or dairy-free alternatives.
By layering with nutritious toppings like avocado, lettuce, and tomatoes, you boost the vitamin and fiber content while keeping things fun and flavorful.
FAQs
Q1: Can I make these tacos ahead of time?
A1: You can prep the beef filling and store it in the fridge for up to 3 days. Assemble and bake just before serving for the best texture. If you pre-bake them, reheat in the oven at 350°F for 10–12 minutes to regain crispiness.
Q2: Will the taco shells get soggy?
A2: If you don’t overload them with wet ingredients (like salsa or tomatoes before baking), the shells stay crispy. Bake uncovered for the final few minutes to dry out any moisture and crisp the edges.
Q3: Can I use flour tortillas instead of taco shells?
A3: For soft tacos, yes — but they won’t get crispy. You could try placing rolled flour tortillas seam-side down in the baking dish and baking them enchilada-style for a different twist.
Q4: What cheese works best?
A4: A blend of sharp cheddar and Monterey Jack melts well and gives bold flavor. You can also try pepper jack for heat, or vegan cheese shreds for a dairy-free option.
Q5: Can I freeze baked tacos?
A5: It’s not recommended to freeze fully assembled baked tacos, as the shells may go soggy. However, you can freeze the cooked meat mixture and thaw when needed to make fresh batches quickly.
Q6: How do I keep tacos warm for a party?
A6: After baking, keep them warm in the oven at 200°F, loosely covered with foil. If needed, serve them in smaller batches so they stay crisp.
Q7: Can I make this recipe gluten-free?
A7: Yes! Just use certified gluten-free taco shells and double-check your seasoning mix to make sure it doesn’t contain hidden gluten or additives.
Print
Crispy baked tacos filled with seasoned beef and gooey melted cheese, all finished in the oven for a hands-off, crowd-pleasing dinner.
- Prep Time: 10 minutes
- Cook Time: 20 minutes
- Total Time: 30minutes
- Yield: 4–6 servings 1x
Ingredients
-
1 lb ground beef
-
2–3 tbsp taco seasoning
-
¼ cup water or tomato sauce
-
10–12 crispy stand-and-stuff taco shells
-
1½ cups shredded cheddar or Mexican blend cheese
-
1 cup refried beans (optional)
-
½ cup diced onion
-
2 cloves garlic, minced
-
Toppings: shredded lettuce, diced tomatoes, sour cream, avocado, cilantro, jalapeños
Instructions
-
Preheat oven to 375°F (190°C).
-
Cook ground beef in a skillet until browned. Drain. Add taco seasoning and water. Simmer for 2–3 minutes.
-
Arrange taco shells upright in a baking dish. Spread refried beans in bottom (optional), then spoon in beef mixture and top with shredded cheese.
-
Cover loosely with foil. Bake for 10 minutes. Remove foil and bake another 7–10 minutes until cheese is melted and shells are crisp.
-
Add toppings and serve immediately.